Camera Purse

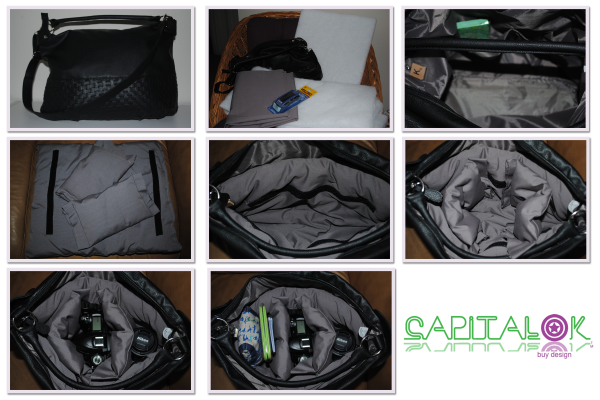
The finished camera purse can be carried without calling attention to you as a tourist. Your camera is easily accessible for a quick photo. If you're doing a full-out shoot, then the shoulder strap will come in handy.
I have a trip planned for next month to visit one of my besties. It’s my first-ever venture to San Francisco, or California for that matter. Everyone has told me how beautiful it is so I want to make sure to have my camera on hand at all times.
The dilemma is that camera bags are not cute. For the most part they are built for function and completely ignore fashion. However, I did find some pretty amazing camera purses. The new dilemma being that they range from $160 – $200, and I’m not willing to pay that for something sight unseen. (Also, the cutest one was out of stock and won’t be available until after my trip.)
Then I came across a few DIY camera purse blog posts from Tatertots & Jello and Live Laugh Eat. Problem solved! I rushed right out to Kohls and bought a cute purse, on sale for about $30. Then I headed over to Jo-Ann Fabrics and Crafts for my materials, where I spent another $25. In addition to my time, because I am far from a seamstress, I have a cute camera purse for only $55. That’s more like it!
Materials:
- Cute Purse – preferably one that zips shut incase of rain, has a flat bottom and a removable shoulder strap
- Fabric – 1 yard
- Batting/Quilt stuffing – 1 yard
- Foam – 1 inch thick
- Velcro – get the heat-activated kind if you’re not patient or good at sewing, which I’m not
- Needle and thread – sewing machine optional

Follow the pictorial from left to right, starting with the top left and working your way down. Purse. Materials. Inside the original purchase. All the padding and how it fits inside.
I looooove this! So cute! Where did you get the purse???
Thanks, Katie! I got the purse at Kohl’s. They were having a 40% sale, so SCORE – Frugalista style!
You’re so crafty! Good job!
Thanks, Traci! I can’t wait for my trip so I can put it to use.